1. FAQ
2. Problems with Glider Ratings
3. Gaggle Flying
4. Gear Setup
5. Flymaster Setup
6. Flytec 6030 Setup
7. Spot VS Delorme
8. XC Task Clinic
9. GPS Comparison
10. Sprint Tasks
11. DIY Cell Mount
12. DIY Flight Deck
13. DIY Catheter
14. Incidence Reports
15. Creating Waypoints
16. Creating Airspace
17. Resources
18. FTV Explained
19. Downloads
How to Create a Waypoint File
Here's a quick instruction set for creating a waypoint list that you can upload to your GPS in just about any format that you want.
Pre-requisites
Steps
- Open up GoogleEarth
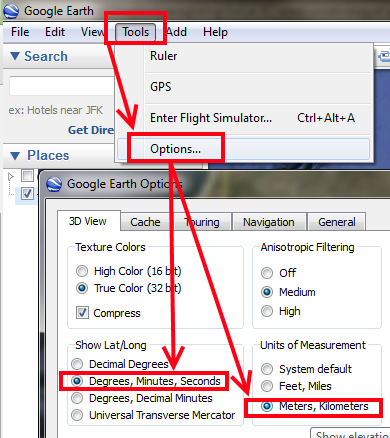
- Go to Tools->Options menu. Make sure units are in metric and co-ordinates are in "Degrees, Minutes, Seconds"

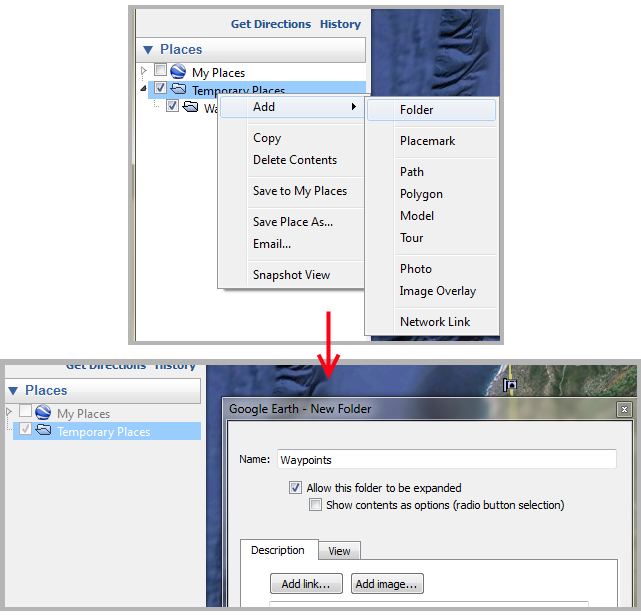
- Create a new folder called 'Waypoints'

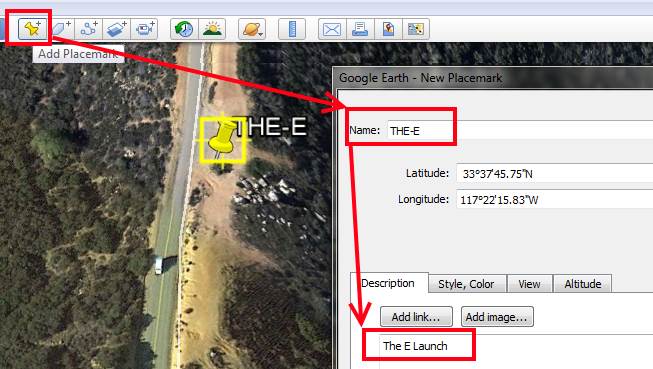
- Use the 'placemark' tool to create a new point. This will open up the waypoint editor
- While the waypoint editor box is open, you can drag the waypoint placemark around on the map screen. I recommend zooming in to make sure the point is exactly where you want it.
- The type of placemark is irrelevant because WPT files do not contain graphical information like this.
- Enter in the name of the waypoint. The max length of the name is 6 characters and should be in upper case. I'm not sure if names support special characters like accents.
- If you want, add in a longer name in the description box down below. This is field is supported by most newer GPS units and allows for a more descriptive name.

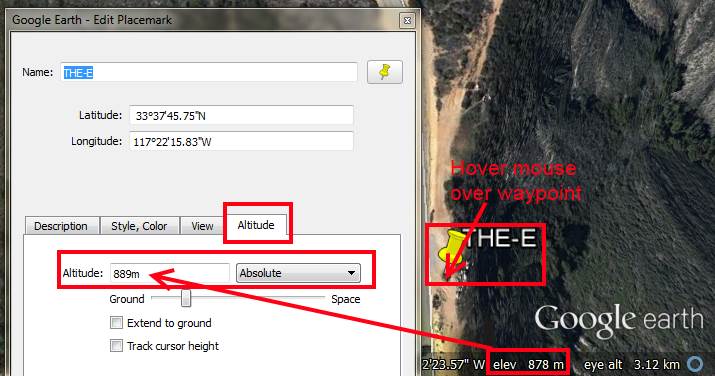
- Now to make sure the waypoint file has altitude information click on the 'Altitude' tab in the placemark editor window.
- Hover your mouse over the waypoint so that you can see the elevation displayed in the bottom right.
- In the altitude editor, set the altitude type to 'Absolute' then enter the elevation that you got while hovering over the turnpoint.

- Click 'Ok' to save the waypoint. Make sure it gets created in the 'Waypoints' folder you created above. If some were created outside the folder you can just drag n' drop them into your folder.
- Repeat these steps until you have all the waypoints you want to create.
- Right click on the 'Waypoints' folder and select 'Save Place As...'
- Save the file as a 'KML' type in whatever location you want with whatever name you like.
- Open up GPSDump.
- Go to 'File'->'Open wpts.' or press 'CTRL+W'.
- In the file dialog select file type of 'KML' and then navigate to wherever you saved your KML file from GoogleEarth and open it up.
- If you get a message like 'Modify (-> uppercase or truncate) this ID?' just click "Yes to All". It means that you did not follow all naming conventions for a waypoints (more than 6 characters or not uppercase).
- Select all waypoints by pressing CTRL+A
- In 'File'->'Save wpts. As...', name the waypoint file whatever you like. Generally I like to save it as the same name as the KML. Make sure to select type as 'Geographical files (*.wpt)'. The only other type I've used is 'GPX files (*.gpx)' which is for some Garmin instruments and FlySkyHy for iPhone.
- You're done! I like to keep both the KML and the final WPT/GPX files around for easy editing in the future.